UE5 sequence + anim

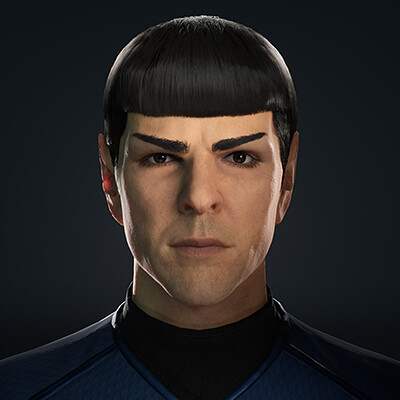
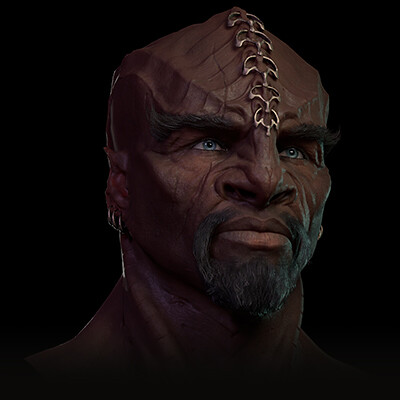
UE5 render

UE5 render
UE5 sequence

Zbrush Sculpt - additional tertiary details for scalp / neck added in the texturing phase in Mari.

Marvelous Designer + Zbrush hoodie - primarily focused on bust region that would be visible in final render, but tried to give everything at least a once over in Zbrush after Marvelous Designer.

xgen guides
turntable 01
turntable 02

Unreal Buffer View - Roughness was a combination of shader parameters with default regions + custom masks, and spec was generated from cavity + shader region adjustments.
UE5 Viewport, toggling through some lighting environments.
Environment shot

Hi all, here's my latest personal project based on Rami Malek as Elliot Alderson from Mr. Robot, rendered in Unreal Engine 5. It's one of my absolute favorite shows and I really enjoyed using the process of working on the likeness, render sequences, lighting, and color grading to attempt to evoke the mood and tone of the series in these renders.
-----------------------------------------------------------------------------
I worked on this project as part of Şefki Ibrahim's Hyperreal Hive / UE5 Character Creation Course, as well as the Hyperreal 3D Character Creation Course. These were all amazing sources of information and feedback for everything from likeness to lookdev, Unreal shaders, grooms, movie render queue, Metahuman animator, Da Vinci Resolve, and more! https://www.artstation.com/sefki_i
-----------------------------------------------------------------------------
I was excited to tackle this project, having been working with scans on the job in recent years and not having done a likeness sculpt in a while. I was also eager to get better acquainted with Unreal's groom system, the latest updates to Metahuman's shaders, learning some Metahuman Animator and sequencer workflows, and an opportunity to learn just a bit of Da Vinci Resolve. This was also my first foray back into Mari in many years, which I haven't touched since it became more explicitly "node-first," and I really loved being able to organize my thoughts and experiments while iterating on the skin textures using a node-based workflow.
-----------------------------------------------------------------------------
I made this model using Zbrush for sculpting, as well as Texturing XYZ displacement maps for base pore data which was applied and further detailed in Zbrush. I textured the head in Mari, with a combination of XYZ + Metahuman albedo + hand painting and manual adjustments. The hoodie was made in Marvelous Designer + Zbrush + Maya + Substance Painter. The hair was made using XGen and set up as an Unreal groom.
-----------------------------------------------------------------------------
The head was rigged using Mesh to Metahuman, and animated using Metahuman Animator with a capture of myself + hand tweaking of keys / curves in Unreal. I'm no facial animator but I really enjoyed dipping my toes into that arena and trying to give the model some life!
-----------------------------------------------------------------------------
Final renders used default Temporal AA with a few CVars to increase quality. My graphics card is a bit outdated so higher AA values generally led to crashes (though I got away with it for 1 or 2 of the stills), but I could definitely see coming back to play with some of this when I eventually upgrade!
-----------------------------------------------------------------------------
Final edits and color grading were done in Da Vinci Resolve.